Friday, October 12, 2012
Trick or Treat Tote Bag Tutorial
Tired of buying your kids a new Trick or Treat bag every year?
You can make an adorable tote for under $10!

Don't let the name limit you. You can use this same pattern to make yourself an every day tote bag for books, gym cloths, yarn, scrapbook materials, you name it!
You can do it, I promise! I know so many of you out there have a sewing machine, but are too afraid to use it. I was one of those people. Let me tell ya, the only way to get over that fear is to jump right in. Are you going to make some mistakes? Of course! Does it matter? NO! Just do the best you can and I promise you will be so proud of yourself.
I always recommend reading through the entire directions a few times before actually starting.
I'll talk you through the whole process:
You will need
- 3/4 yard outer fabric
- 3/4 yard fabric for lining

Cut a rectangle measuring 27 inches long by 15 inches wide from the outer fabric and the lining fabric.
Cut 2 rectangles for the straps each 22 inches by 4 inches.

Those are the only 4 pieces you need!
Fold the outer fabric right sides together (right side = outside of the finished bag) so you have a shape 13.5 inches by 15 inches.
Stitch along the open side, then down across the bottom. So now the only opening is at the top.

Fold the lining fabric right sides together as you did with outer fabric.
Stitch along the outside edge of the bag and the bottom. When you sew the lining bottom, leave a 5 inch opening across the bottom. This will be what you use to eventually flip the bag right side out.
Now take the outer bag (still inside out) and make the bottom corner into a triangle. Adjust the fabric as best you can to make it even. Now measure from the triangle point inwards 2 inches. Mark a line 2 inches in. Stitch on that line.

Cut to the right of the stitch line, cutting off the triangle. (This creates a "box bottom")

Repeat those steps on the other side of the outer fabric, and on both sides of the lining fabric .
Take one of the strap pieces and fold it in half right sides together so the width is now 2 inches. Sew along the long side only with a 1/4 inch seam. Repeat to the other strap.
 \
\
Fasten a safety pin on the edge of one lip of one side of the strap. Feed it through the tube to turn it right side out. Repeat to the other strap.

Iron the straps.

Turn the lining fabric right side out. Place the lining fabric inside the outside fabric. They should be right sides together.

**You are going to insert the straps exactly like the picture below (since it will be inside the bag, I wanted to show you how it should look) Make sure the same sides of the straps are being attached to the correct sides. **

Place the strap between the lining fabric and the outer fabric. The loop will be upside down inside the bag. Pin the straps in place.

Can you see the strap edges poking out here?
Repeat on the other side of the bag with the other strap. Be sure to line up the straps on both sides so they match.

Stitch along the top of the bag with a 1/2 inch seam allowance.

Pull the 2 fabrics apart. Using the hole in the bottom of the lining fabric, pull the outside fabric through so it will be right side out. (This is where you say a prayer that you did everything right.)

If it looks like this, hurray!! You can breath now.

Now you are going to close that hole in the lining. Turn the edges of the hole inwards, then stitch narrowly to close the entire opening.

Put the lining in the bag. Press the top edge if you need to keep in place. Then using a 1/4 inch seam allowance, TOPSTITCH around the entire outside of the bag. This line will be visible, so take your time to get it to look as nice as you can. Do your best. If the line is wonky.... no one will notice, but you, so don't sweat it ;-)

You're done!!! You just made an adorable trick or treat tote bag!
With lining!


Before you know it, I bet you will be sewing up a bunch of these as gifts.

"Mommy, where is the candy?"
Now you're all ready to collect all that candy from parades and trick or treat night.
Please let me know if you need any help with the tutorial. If you sew one, please make my day and send me a picture :-)
Thanks for stopping by!
<3

This project has been linked up to:


Wednesday, October 10, 2012
Peanut Butter Chocolate Chip Granola Bars
"Mommy, I want something to eat!"
Does anyone else hear this every 15 minutes? I sure do. I guess the girls got their appetites from me. I really think sometimes I'm feeding teenage boys instead of a 4 and almost 2-year-old.
I'm always searching for quick, easy, and healthy snacks for my girls, plus something that I can send along in my pre-schooler's lunchbox. An apple, banana, yogurt, or these granola bars are my usual go-to snack.

These homemade granola bars are perfect! My recipe is inspired by this one from The Gracious Pantry Blog. They are packed with protein, fiber, and healthy omega-3s. Plus they are mostly sweetened naturally with honey and applesauce. They only added sugar is in the chocolate chips.
They are super easy and quick to make. This recipe makes about 24 bars.
Ingredients:
- 2.5 cups of quick oats
- 1.5 cups peanut butter (try for no sugar added)
- 3/4 cup honey
- 3/4 cup unsweetened applesauce
- 5 tbls. chocolate chips
- 3 tbls. chia seeds
- 2 tbls. cinnamon
- 1/4 tsp. nutmeg
- 1/4 tsp. ground cloves
- 1/4 tsp. ground ginger
Directions:
Place oats on a tinfoil covered baking pan. Roast them in the oven at 375 degrees for 15 minutes. (Do not use oil)

Let them cool for about 20-30 minutes.
Mix together the oats, spices, peanut butter, honey, chia seeds and applesauce.
Once that looks well blended, fold in the chocolate chips.

Place your mixture back onto your foil covered baking sheet. With a spatula, spread and shape into a rectangle.

You can shape it to the thickness you want.

Bake at 350 degrees for about 20 minutes.
When you take them out of the oven, let them cool for about 3 minutes, then slice them while they are still warm. You can slice them into square bars, like I did, or into traditional rectangular ones.

Transfer them to a cooling rack. Once completely cool they can be stored in a sealed container in your pantry.
You're done! Super healthy, super yummy.
Even my husband, who doesn't exactly like "healthy" food, thinks these are tasty. Plus my girls gobble them up and I don't have to feel any mom guilt. You know the guilt you get when your child comes running up to you begging for something to eat, and out of desparation you tell them, "here just eat a cookie".
Yeah, I know that feeling.
Thanks for stopping by!
<3
Tuesday, October 9, 2012
I Cut Up My Bridesmaid Dress
***This is a project I did over 2 years ago BTB (before the blog). The pictures are bad and were not at all intended for blog world. I'm sorry I don't have more pictures of the steps to make this into a better tutorial. It's very special to me, though, so I wanted to share it with you all. Please feel free to ask any questions if you would like to make your own. I'd be happy to help in any way I can! ***
First, let me introduce you to one of my favorite couples, Heather and Jason.

I sat beside Heather on the first day of beauty school and talked her ear off. She wondered if I would ever shut up. LOL What?! I had first day jitters! We became housemates (with our other good friend, Jenn) and the three of us had fantastic adventures going to Dunkin Donuts at 1 in the morning and watching Newlyweds on MTV (remember Nick and Jessica? wow, how long ago was that?!)
Heather was a bridesmaid when I got married in 2007 and I was a bridesmaid in her wedding in 2009.
You see, I was just starting to get into sewing and at that time had just finished making a quilt for my oldest daughter, and one for my mom. I was a quilting maniac.
So I did something ballsy.......

I cut up my bridesmaid dress from her wedding.

My idea was to use the fabric from my dress as blocks in a quilt for their baby girl.
I had never done anything like that and was seriously sweating it. I felt like I had Tim Gunn over my shoulder saying "Make it work, Angela".
No one wants to let Tim Gunn down.
I purchased a few other fabrics in soft, baby, flannel then cut them in squares.

I sewed them together in rows, then attached the rows together.
After adding batting in the middle, and a big piece of baby flannel for the backing, I quilt a simple grid pattern on it, then added binding.
To add a touch of sweetness, I free-motioned hearts on some random squares.

I gave Heather the quilt at her baby shower. I was nervous she wouldn't recognize the squares from the dress, so in her card, I enclosed the pictures you see above. (She later told me she was confused by the cut up dress picture and momentarily panicked and thought I was "friend-breaking-up" with her!
Then she saw the quilt and absolutely loved it.
Can you believe I missed watching her open it because I was in the bathroom?! I was 8 months pregnant with my second at her shower, so I was peeing every 15 minutes or so. TMI?
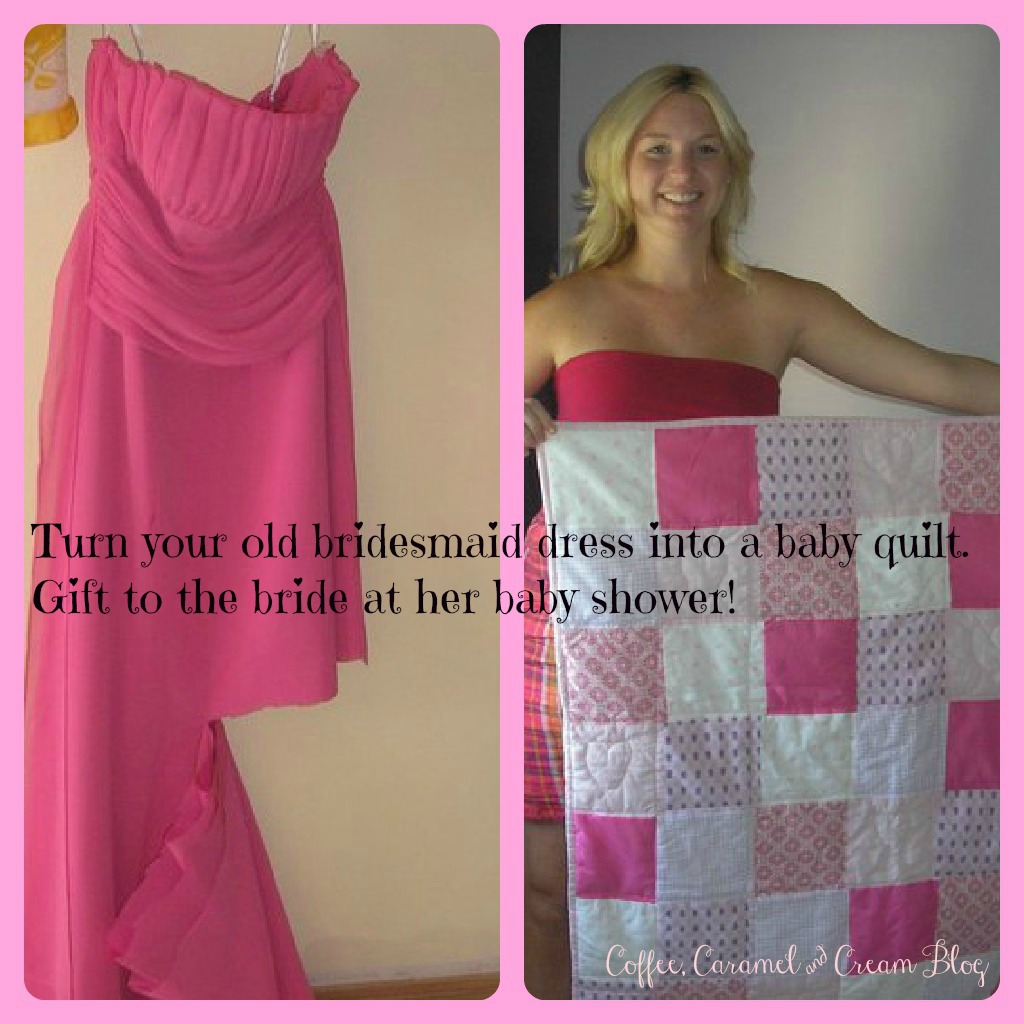
The quilt is far from perfect, but it's made with lots of love.
I LOVE that her daughter, Layla (now 2!), will always have a piece of her mommy and daddy's special day.
Thanks for stopping by, I hope you come back and visit soon!
<3
This project has been added to the linky party over at
and

Monday, October 8, 2012
Crockpot Angel Chicken
My crock pot and I have become BFFs.

I LOVE putting the ingredients in at noon while my girls are eating lunch, and then at 5:00 all I have to worry about getting together are the brown rice and veggies I serve as sides. Plus your house smells yummy for hours while your dinner is cooking away. It's almost like having an in house chef ... ok not really .... but it does make your life easier, and let's face it.... we all need a little help some time.
This recipe has become a fast favorite in our house.
What you need:
- 4 chicken breasts
- 1 pack of mushrooms (rinsed)
- 1 tub of Philadelphia Cooking Cream in Italian Herb and Cheese (or a regular block of CC plus a packet of dry italian dressing mix)
- 1 can cream of mushroom soup
- 2 tbls. butter
- 1/3 cup dry wine (I used Cabernet)
Place everything in your crock pot. Cook on high for 5-6 hours or low for 8-9 hours. After about 3 hours I give everything a good stir to make sure the sauce blends.

You're welcome ;-)
Thanks for stopping by!
<3
Sunday, October 7, 2012
Whole Wheat Pumpkin Pie Pancakes
I woke up today and was cold. Could it be? Is fall really here to stay? Yippee!!! The leaves have begun to change into a beautiful ombre of burgundy, orange, and gold. I flanked my front door with bountiful mums. I retired my sundresses and replaced them with cozy jeans, boots, and sweaters. I'm so ready for fall.
I slipped on my fuzzy slippers and padded downstairs to make some coffee and pumpkin.....anything! How about some pumpkin pie pancakes? How about if I make them with no sugar and whole wheat flour so they are healthy and still taste yummy?

Ingredients:
- 2 cups whole wheat flour
- 1.5 cups pumpkin
- 2 tsp. baking powder
- 2 tsp. baking soda
- 4 tbsp. honey
- 2 eggs lightly beaten
- 1 3/4 cup milk
- 2 tsp. unsalted butter (melted) plus one slab for frying
- 1/2 tsp. salt
- 1 tbsp. cinnamon
- 1/2 tsp. nutmeg
- 2 tbsp. chia seeds (optional)
Whisk together flour, baking powder, baking soda, salt, cinnamon, nutmeg, and chia seeds.

Add milk, egg, melted butter, and honey.

Mix until well blended.

Fold in pumpkin.

Heat pan to medium.
Melt that extra slab of butter once the pan is hot.
Ladle mix into pan to size desired.
Cook about 5 minutes each side.

Serve with maple syrup and enjoy your pumpkin pie for breakfast :-)

Makes about 12 good size pancakes. You can put the extra in the fridge for tomorrow's breakfast. Simply warm them up in the microwave when you are ready for them. Enjoy!!
Thanks for stopping by!
<3
Subscribe to:
Posts (Atom)
 |
 |
 |
 |
About Me

- CoffeeandCream
- Hi! Thanks for stopping by. I'm a 28-year-old mommy who loves to bake,cook, decorate,sew,and DIY everything I can get my hands on. Grab yourself a cup of coffee and enjoy my adventures!
Grab My Button!

I've Been Featured!

